CSharp.Mongo.Migration
Building and Releasing an Open Source Library using .NET & GitHub
Open source libraries are a major part of developing software, whether consuming them as libraries through a package manager, interacting with other developers, or contributing back to the community, there aren’t many projects or organisations that don’t rely on open source software.
This article will cover the basics of getting started with library development in .NET and GitHub using the CSharp.Mongo.Migration library as an example.
Setting Up a Repository (with GitHub)
In software development, version control is a must. Sharing, collaboration, and discussion are all large parts of open source software development. GitHub is a great (and free, for public repositories) tool to manage:
- Code with git
- Documentation through wikis
- Issue tracking and discussion
- Simple kanban style project management
- Continuous integration and continuous delivery (CI/CD)
Creating the Repository
In order to get started with a new GitHub repository we'll need to sign up for an account (or use an existing one).
Decisions
There are a number of decisions that should be made before getting started on an open source library:
- Name: this is the user visible name of the repository, and therefore library or project, in .NET this might be the solution name, or root project namespace
- Open source licence: This licence will help to protect the project from unfair use, see https://choosealicense.com/ for the basics on selecting a licence
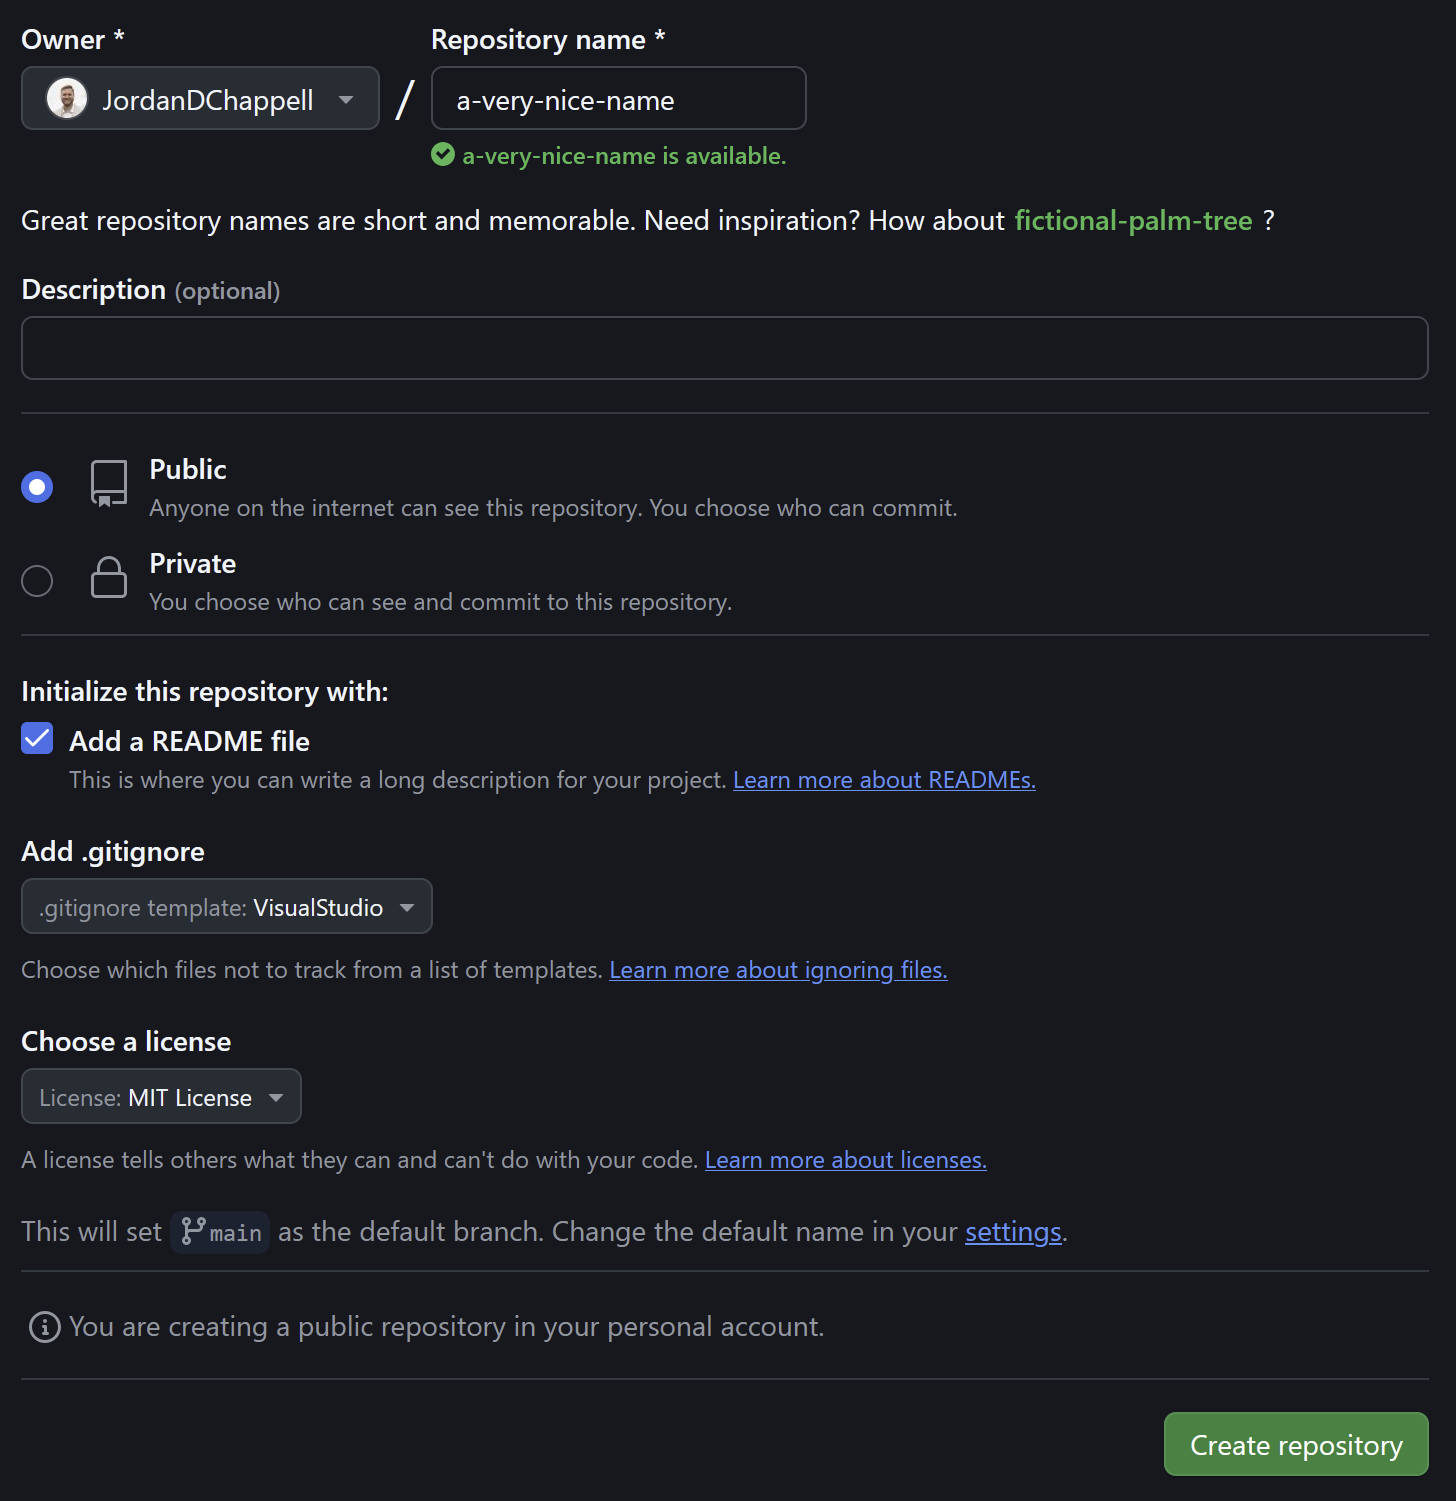
GivenDefault Options
There are some assumed settings for a new open source, .NET repository:
- Visibility: This should be public, otherwise we aren’t really building an open library!
- Readme: All public libraries should have a helpful README.md file, here's an example
- gitignore: ‘Visual Studio’ is the default ignore file for .NET projects
- Licence: As mentioned above, it's best to include a LICENSE file in the repository root, here's an example
Configuring the Repository
Consider enabling the following extra features for the repository:
- Wikis: Consider adding a wiki to document the library.
- Issues: Allows viewers or collaborators to log bugs, or raise ideas for the library implementation.
- Projects: Collaborators can view issues in a kanban board and track progress of milestones.
Cloning the Repository
Now that we have a repository on GitHub with a few of the default files we'll need to initialise a local clone of the source.
Make sure to install and configure git and add an SSH key to GitHub before attempting to clone the repository.
The easiest way to clone a repository is to visit the repository page on GitHub, click the 'Code' button, copy the repository URL, and run the git clone command in a terminal:
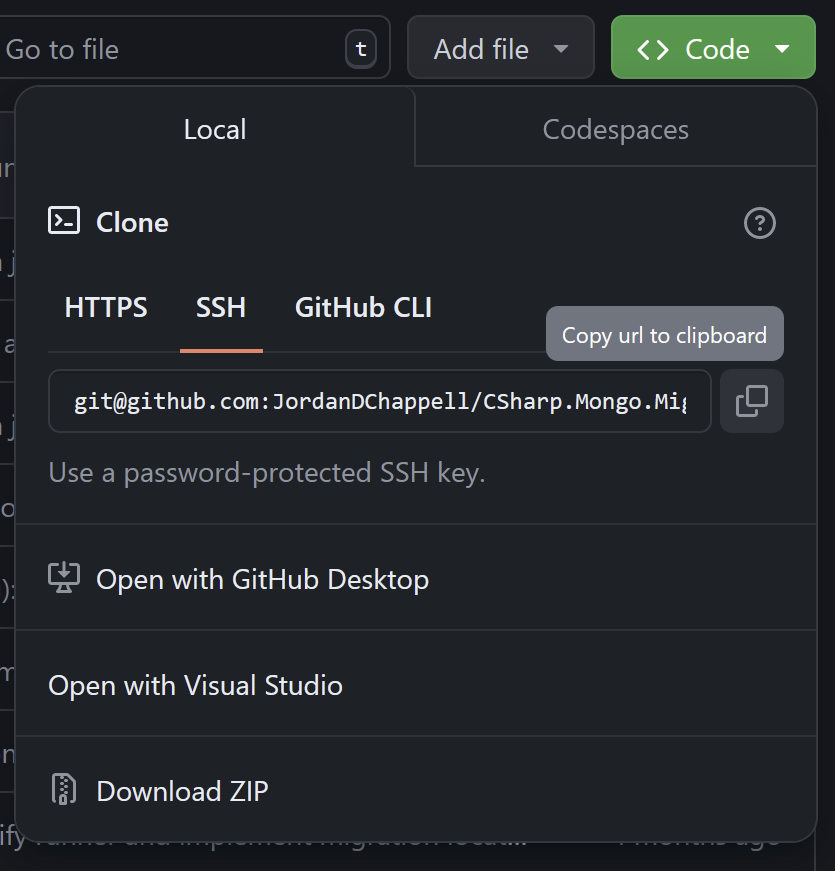
mkdir ~/dev
cd ~/dev
git clone git@github.com:JordanDChappell/CSharp.Mongo.Migration.git
Getting Started With .NET
.NET is a free and open source cross-platform framework supported by Microsoft where most applications are written in the C# programming language. The platform can be used to build web and desktop applications, as well as command line utilities, services, and class libraries.
Prerequisites
Before diving in we will need the following:
- .NET SDK
- A code editor or IDE:
Creating the Project
The .NET SDK includes a large variety of different project templates that can be viewed here or by running dotnet new list from a terminal.
Most .NET projects (especially those that are developed using the Visual Studio IDE) include a solution (sln) file and one or more project files (csproj) to organise all of the code and configuration.
We'll be using the sln and classlib templates to create a library with the same name as our repository on GitHub:
cd ~/dev/CSharp.Mongo.Migration
dotnet new sln
dotnet new classlib
dotnet sln ./CSharp.Mongo.Migration.sln add ./CSharp.Mongo.Migration.csproj
The solution and project will be named based on the directory that you run the command from, or can be set explicitly using the --name argument.
If you followed along exactly as described above the project will have the following folder structure:
~/
├─ dev/
│  ├─ CSharp.Mongo.Migration/
│  │  ├─ .git/
│  │  ├─ obj/
|  |  ├─ .gitignore
│  │  ├─ Class1.cs
│  │  ├─ CSharp.Mongo.Migration.csproj
│  │  ├─ CSharp.Mongo.Migration.sln
|  |  ├─ LICENSE
|  |  ├─ README.md
This structure would be perfectly fine for a very small library with a tiny number of code (cs) and other files, but may become unorganised as the library grows. I suggest that we create the following directory structure instead with a few simple rules:
- Code should be placed in the
src/directory - C# projects should be placed in their own named directories under the
src/directory - Other IDE and configuration content that does not relate to the source should be in the root of the repository
- E.g. directories like
.vscode/for IDE config, or.github/for workflows and actions
- E.g. directories like
cd ~/dev/CSharp.Mongo.Migration
dotnet new sln
mkdir src/CSharp.Mongo.Migration
cd src/CSharp.Mongo.Migration
dotnet new classlib
dotnet sln ~/dev/CSharp.Mongo.Migration/CSharp.Mongo.Migration.sln add ./CSharp.Mongo.Migration.csproj
~/
├─ dev/
│ ├─ CSharp.Mongo.Migration/
│ │ ├─ .git/
│ │ ├─ src/
│ │ │ ├─ CSharp.Mongo.Migration/
│ │ │ │ ├─ obj/
│ │ │ │ ├─ Class1.cs
│ │ │ │ ├─ CSharp.Mongo.Migration.csproj
│ │ ├─ .gitignore
│ │ ├─ CSharp.Mongo.Migration.sln
│ │ ├─ LICENSE
│ │ ├─ README.mdNote: you will need to update your solution references if you manually move the CSharp.Mongo.Migration project directory.
Project Settings
A .NET .csproj file can be used to provide information about the project that may be used by downstream processes, I'd recommend adding the following tags to your own project file:
<RootNamespace>CSharp.Mongo.Migration</RootNamespace>
<PackageId>CSharp.Mongo.Migration</PackageId>
<Title>CSharp.Mongo.Migration</Title>
<Authors>Jordan Chappell</Authors>
<Copyright>Copyright (c) Jordan Chappell (2024).</Copyright>
<Description>
  Simple script based MongoDB database migrations written and run in .NET.
  GitHub: https://github.com/JordanDChappell/CSharp.Mongo.Migration
</Description>
<Tags>mongo, mongodb, migration, database</Tags>
<RepositoryUrl>https://github.com/JordanDChappell/CSharp.Mongo.Migration</RepositoryUrl>
<RepositoryType>git</RepositoryType>
<PackageLicenseExpression>MIT</PackageLicenseExpression>
<PackageReadmeFile>README.md</PackageReadmeFile>
<GenerateDocumentationFile>true</GenerateDocumentationFile>
We've described a lot of information about our library in the .csproj file above, ensure that you tailor the content to suit your own use case.
Testing in .NET
It's pretty important for any software project to include a variety of different kinds of automated or manual test processes. When creating something open source, automated tests that gate PRs and releases can help to reduce problems or issues, and are a great way to give others confidence in using your library.
Test Libraries
There are three main testing libraries that are recommended in the .NET ecosystem:
In this example, we'll be using xUnit as the library for writing and running tests as well as AutoMoqCore for simple dependency mocking in our tests.
Creating a Test Project
As before, the .NET SDK includes templates for unit test projects, and specifically, one for xUnit. Let's create a new project directory and unit test project in our codebase, link the required project and solution files, and add package references:
mkdir ~/dev/CSharp.Mongo.Migration/src/CSharp.Mongo.Migration.Test
cd ~/dev/CSharp.Mongo.Migration/src/CSharp.Mongo.Migration.Test
dotnet new xunit
dotnet sln ../../CSharp.Mongo.Migration.sln add ./CSharp.Mongo.Migration.Test.csproj
dotnet add ./CSharp.Mongo.Migration.Test.csproj reference ../CSharp.Mongo.Migration/CSharp.Mongo.Migration.csproj
dotnet add ./CSharp.Mongo.Migration.Test.csproj package AutoMoqCore
Packaging & NuGet
NuGet is a package repository and management tool that is provided alongside the .NET ecosystem. It's the most simple way to host your library for others to utilise. In order to submit a package to NuGet, we'll need to bundle our library into something that it can recognise and accept.
NuGet
In order to push packages to NuGet you will need to sign up for a free account using an existing Microsoft account and optionally create an API key.
Dotnet Pack
The .NET SDK comes with a command that will bundle our library, including a .nupkg and any other outputs that are required of the library.
In order to package the CSharp.Mongo.Migration library code, run the following command:
dotnet pack --configuration Release \
  /p:PackageVersion=0.0.1-alpha \
  ~/dev/CSharp.Mongo.Migration/src/CSharp.Mongo.Migration/CSharp.Mongo.Migration.csproj \
  --output ~/dev/packages/CSharp.Mongo.Migration
We have packaged the library with some arguments:
- Release configuration
- Version
0.0.1-alpha - An output directory separate to the source code
It's a good idea to include your project's README file with your NuGet package, this can be achieved by linking the README file as a project file. See my CSharp.Mongo.Migration.csproj file for an idea of how to include a packaged / linked file.
NuGet Push
Once we've generated our package, we could simply upload the required files to NuGet using our web browser. This would be a valid approach if we didn't have plans to release more than a couple of versions of the library. The .NET SDK includes a nuget command which can be used to push our package to the repository.
Once we've set up an account and created an API key, we can run the following command to push our package to NuGet:
cd ~/dev/packages/CSharp.Mongo.Migration
dotnet nuget push "*.nupkg" --api-key {{yourApiKeyGoesHere}} --source https://api.nuget.org/v3/index.json
NuGet completes a package validation process before a package is considered published, if you can't immediately see your package, wait at least 10 minutes for the validation to complete.
CI/CD in GitHub
GitHub offers a well supported CI/CD platform called Actions that is extremely easy to integrate into a project hosted on GitHub. Actions offers a set of hosted runners across Linux, Windows, and MacOS that are free and unlimited for use in public repositories.
Workflows are written in YAML and are composed of one or more jobs that can be run sequentially or in parallel. Jobs will run inside their own VM / container.
The CSharp.Mongo.Migration project has 4 different workflows:
- CI: Build the project on every pushed commit
- PR: Test, and check code formatting on PR creation and update
- Docs: Extract in-code documentation and release to a wiki page, runs on changes merged to the main branch
- CD: Deploy a new version of the package to NuGet each time a GitHub Release is created
CI - Build
This is one of the cornerstones of continuous integration, building code that is pushed to a shared repository will reduce the number of errors introduced when changes are made.
This workflow builds the source code on every pushed commit, in .NET this is a single terminal command:
CI - Test
This workflow runs for pull requests and will build and test the source code to ensure that changes don't fail any existing assertions before they are merged into the main branch.
In .NET, we run the following terminal command to run tests in a project:
dotnet test ~/dev/CSharp.Mongo.Migration/src/CSharp.Mongo.Migration.Test/CSharp.Mongo.Migration.Test.csprojDocs
A less common workflow that extracts documentation from the code and pushes it to a central wiki so that it can be referenced by developers and users of the library.
Any commit that is made on the main branch, often as the result of a successful pull request, will trigger this workflow.
We'll cover more on the documentation for this library a little later.
CD - Deploy
The deployment workflow isn't actually achieving continuous delivery for the library, but it does automatically deploy the package to NuGet when a release is created in GitHub.
The trigger for this workflow is fired when a release is created and published in GitHub, the workflow will then build, package, and push the library to NuGet, with a version identifier matching the name of the release.
Documentation
Tracking Issues and Development
There are stacks of software project management tools available, ranging from free or open source to paid cloud based SaaS solutions. These products aren't going to be covered as part of this document, instead we will focus on one of the tools that was suggested to be enabled when setting up the repository.
The CSharp.Mongo.Migration library utilises free tools available directly in GitHub for tracking and managing issues and features: GitHub Issues and Projects.
GitHub Issues
Issues can be used for a wide variety of things in GitHub, most commonly they are a way to track tasks and features, or to receive feedback and bug reports from users of your library.
GitHub Projects
A very simple Kanban / task tracking board that integrates with issues, milestones, and releases.
I wouldn't recommend GitHun Projects for anything larger than a handful of people working on a small library, but it was useful to see the features that needed to be implemented before the library could be released.